DOOM in the iOS Photos app
Well, kind of
Sep 23, 2024
I made a game with Adnan Aga. It’s DOOM, but it runs inside the iOS photos app. Kind of.
look, we eventually manage to get up some stairs
It is…technically playable? We managed to pick up some power ups and shoot at some enemies. It requires 8 manually configured iOS shortcuts, a dedicated photos folder, and a separately configured computer.
Let’s look at how it works!
Why
I’ve been trying to embed a game in the iOS walled garden for most of a year. I like putting games in weird places and iOS is a clasically locked down ecosystem, which makes it a fun target.
Adnan and I were both doing a camp at ITP this past summer and wanted a break from our longer-term projects - we thought that building a weird game inside iOS would be a fun diversion.
Discarded Prototypes
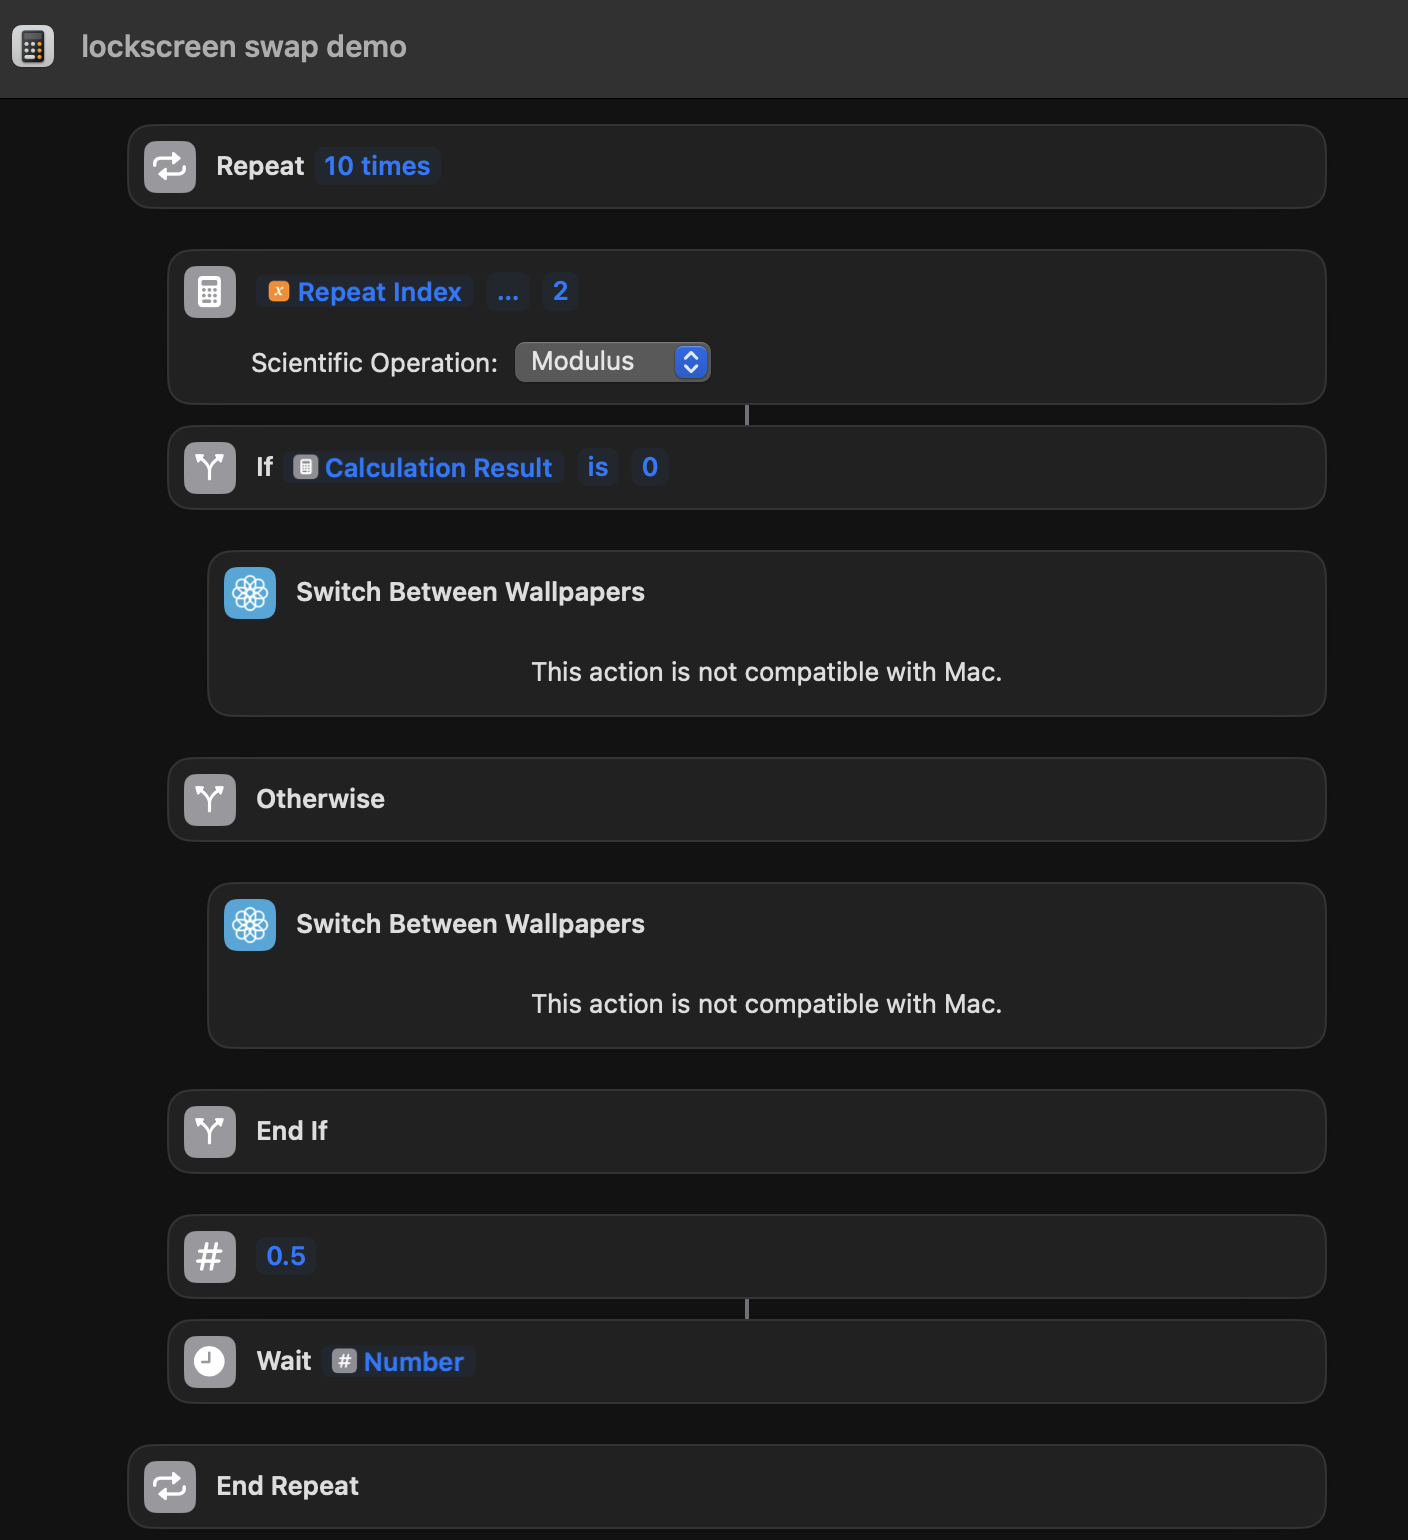
To start, we searched for UI elements that we could abuse to display something interesting to the user. The first thing that we found was the lockscreen background. This was initially promising - it was easy to swap out the background with a shortcut, and we could easily get a reasonable framerate (here a proof of concept running at 2 FPS):

can't say I'd want my background to do this all the time tbh
This seemed promising! We started kicking around ideas for animations we could run on the lockscreen - we thought maybe we could run a whack-a-mole game where the lockscreen would cycle between different “mole” positions that overlapped with icons that you’d need to tap at the right time. But we ran into two problems:
- We wanted to make our app icons translucent (so that you could see the “mole” behind the icon) and you…can’t do that. We probably could have worked around this, but…
- There’s a pretty low cap on the number of different lockscreen backgrounds you can have (I think it’s 10?) - which would have really limited the types of animations we could run.
The second point there seemed like a big problem - we wanted a dynamic game, and 10 frames just didn’t seem dynamic enough. So we started looking around - and quickly found something exciting.
iOS shortcuts can download images!
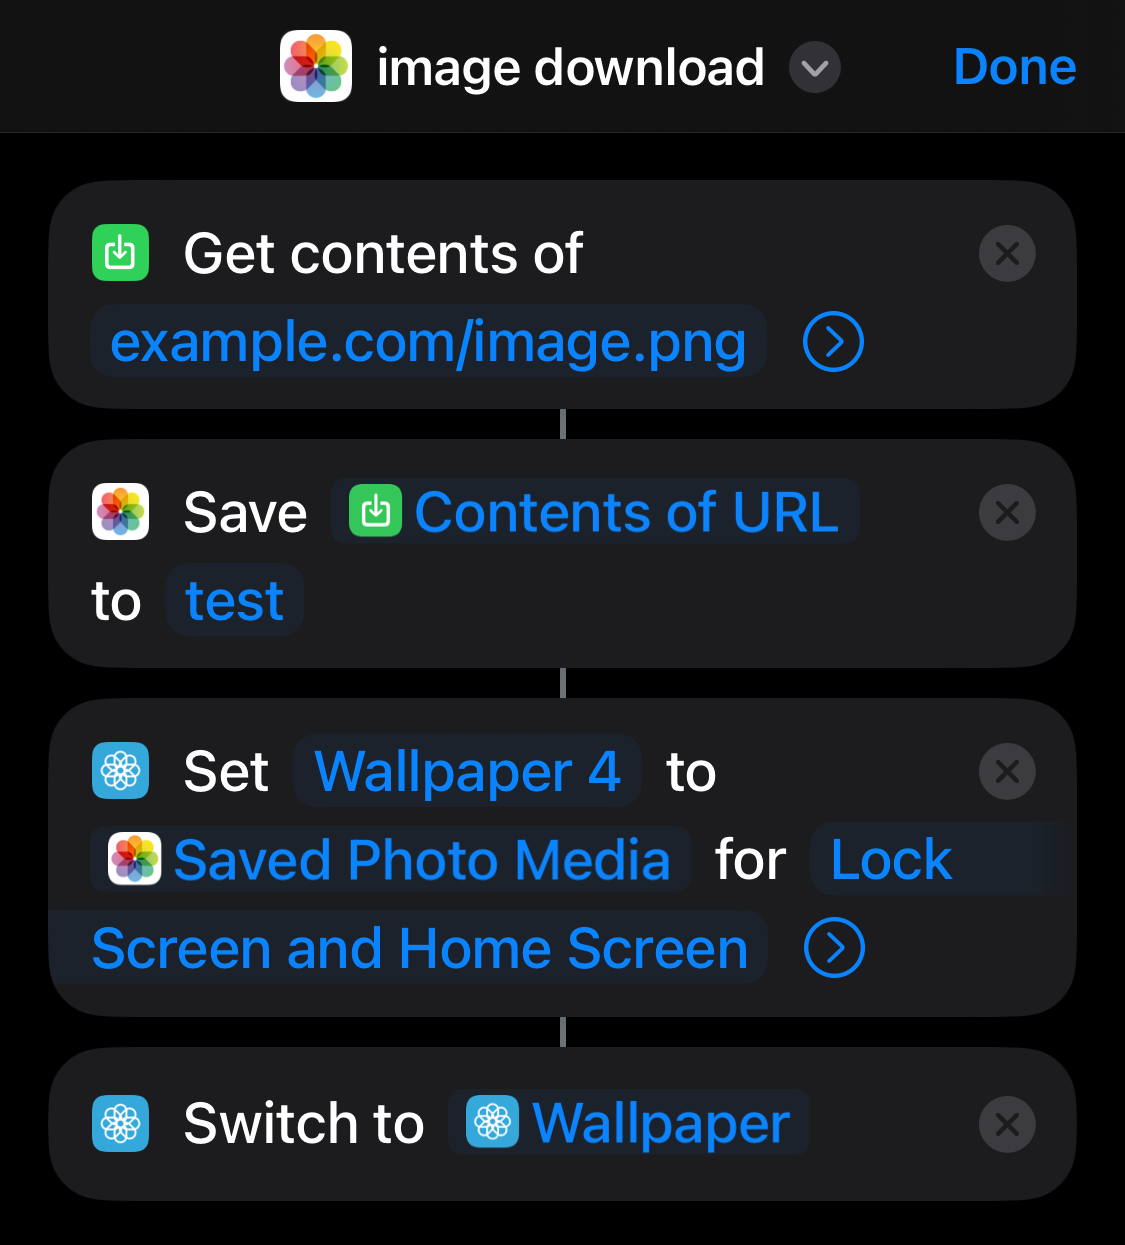
iOS shortcuts can hit arbitrary URLs and download images! So we could have a whole separate webserver that ran our game, and it could serve up images that we could slam onto the lockscreen background.

shortcuts are wild
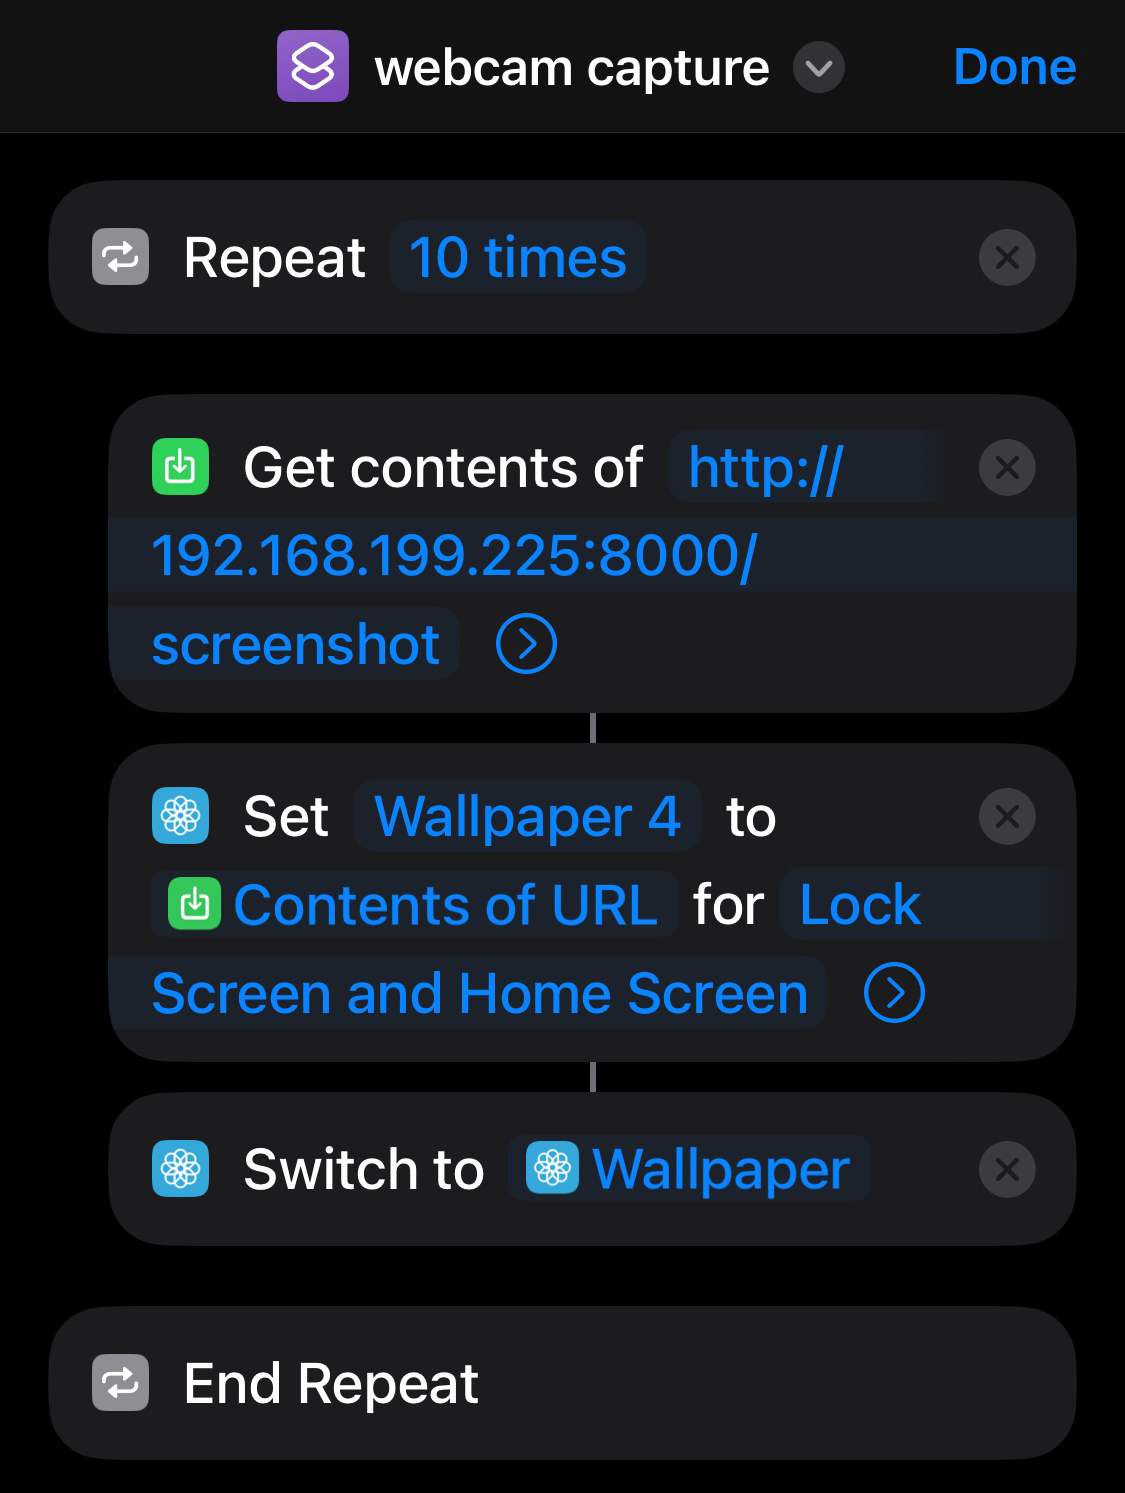
After testing a shortcut that downloaded an image from a website and set it as my lockscreen, I set out to prototype something dynamic. I settled on a shortcut that would capture an image from my laptop webcam and save it as my wallpaper because that seemed like a fun thing to do. So I wrote a simple server with an endpoint that would return a photo from my laptop webcam, and configured a shortcut that hit that server endpoint and saved the photo to my lockscreen in a loop.
the shortcut in action
The shortcut code for this was pretty simple

shortcuts are *really* wild
And here's the server code if you're curious.
from flask import Flask, Response
import cv2
from PIL import Image
import io

app = Flask(**name**)

# iPhone 14 mini dimensions in portrait mode

IPHONE_WIDTH = 1080
IPHONE_HEIGHT = 2340

cap = cv2.VideoCapture(0)

@app.route('/screenshot')
def get_screenshot():
    ret, frame = cap.read()
    if not ret:
        return "Failed to capture screenshot", 500
    frame = cv2.cvtColor(frame, cv2.COLOR_BGR2RGB)
    img = Image.fromarray(frame)

    width, height = img.size
    aspect_ratio = IPHONE_WIDTH / IPHONE_HEIGHT
    if width / height > aspect_ratio:
        new_width = int(height * aspect_ratio)
        left = (width - new_width) // 2
        right = left + new_width
        img = img.crop((left, 0, right, height))
    else:
        new_height = int(width / aspect_ratio)
        top = (height - new_height) // 2
        bottom = top + new_height
        img = img.crop((0, top, width, bottom))

    img = img.resize((IPHONE_WIDTH, IPHONE_HEIGHT))
    img_bytes = io.BytesIO()
    img.save(img_bytes, format='JPEG')
    img_bytes.seek(0)
    response = Response(img_bytes.getvalue(), mimetype='image/jpeg')
    response.headers.set('Content-Disposition', 'inline', filename='screenshot.jpg')

    return response

if **name** == '**main**':
    try:
        app.run(host='0.0.0.0', port=8000)
    finally:
        cap.release()
So this worked great! Except that there was a big problem. That video is running at 5x speed. The shortcut was really slow.
At first we thought this was a problem with downloading the image - but more testing showed that it was the act of setting a new wallpaper photo!
You can see this for yourself without a shortcut; if you choose a new photo, there’s this delay - I assume that it’s some kind of processing to make the photo look nice, choose the text color of your icons, etc - before you can actually save it. And that delay is around 5 seconds.
those delays add up in a game
So this approach gave us dynamic lockscreen content, but we were limited to 1 frame every 5 seconds. That didn’t seem workable. But during our debugging process we had a different idea…
What if we just ran it from the photos app?
At some point while testing, we removed the logic to set new wallpaper photos (to check how quickly we could download images). And that was fast - the images flew into the photos app.
So we came up with a new plan - what if we ran our animations inside the iOS photos app itself?
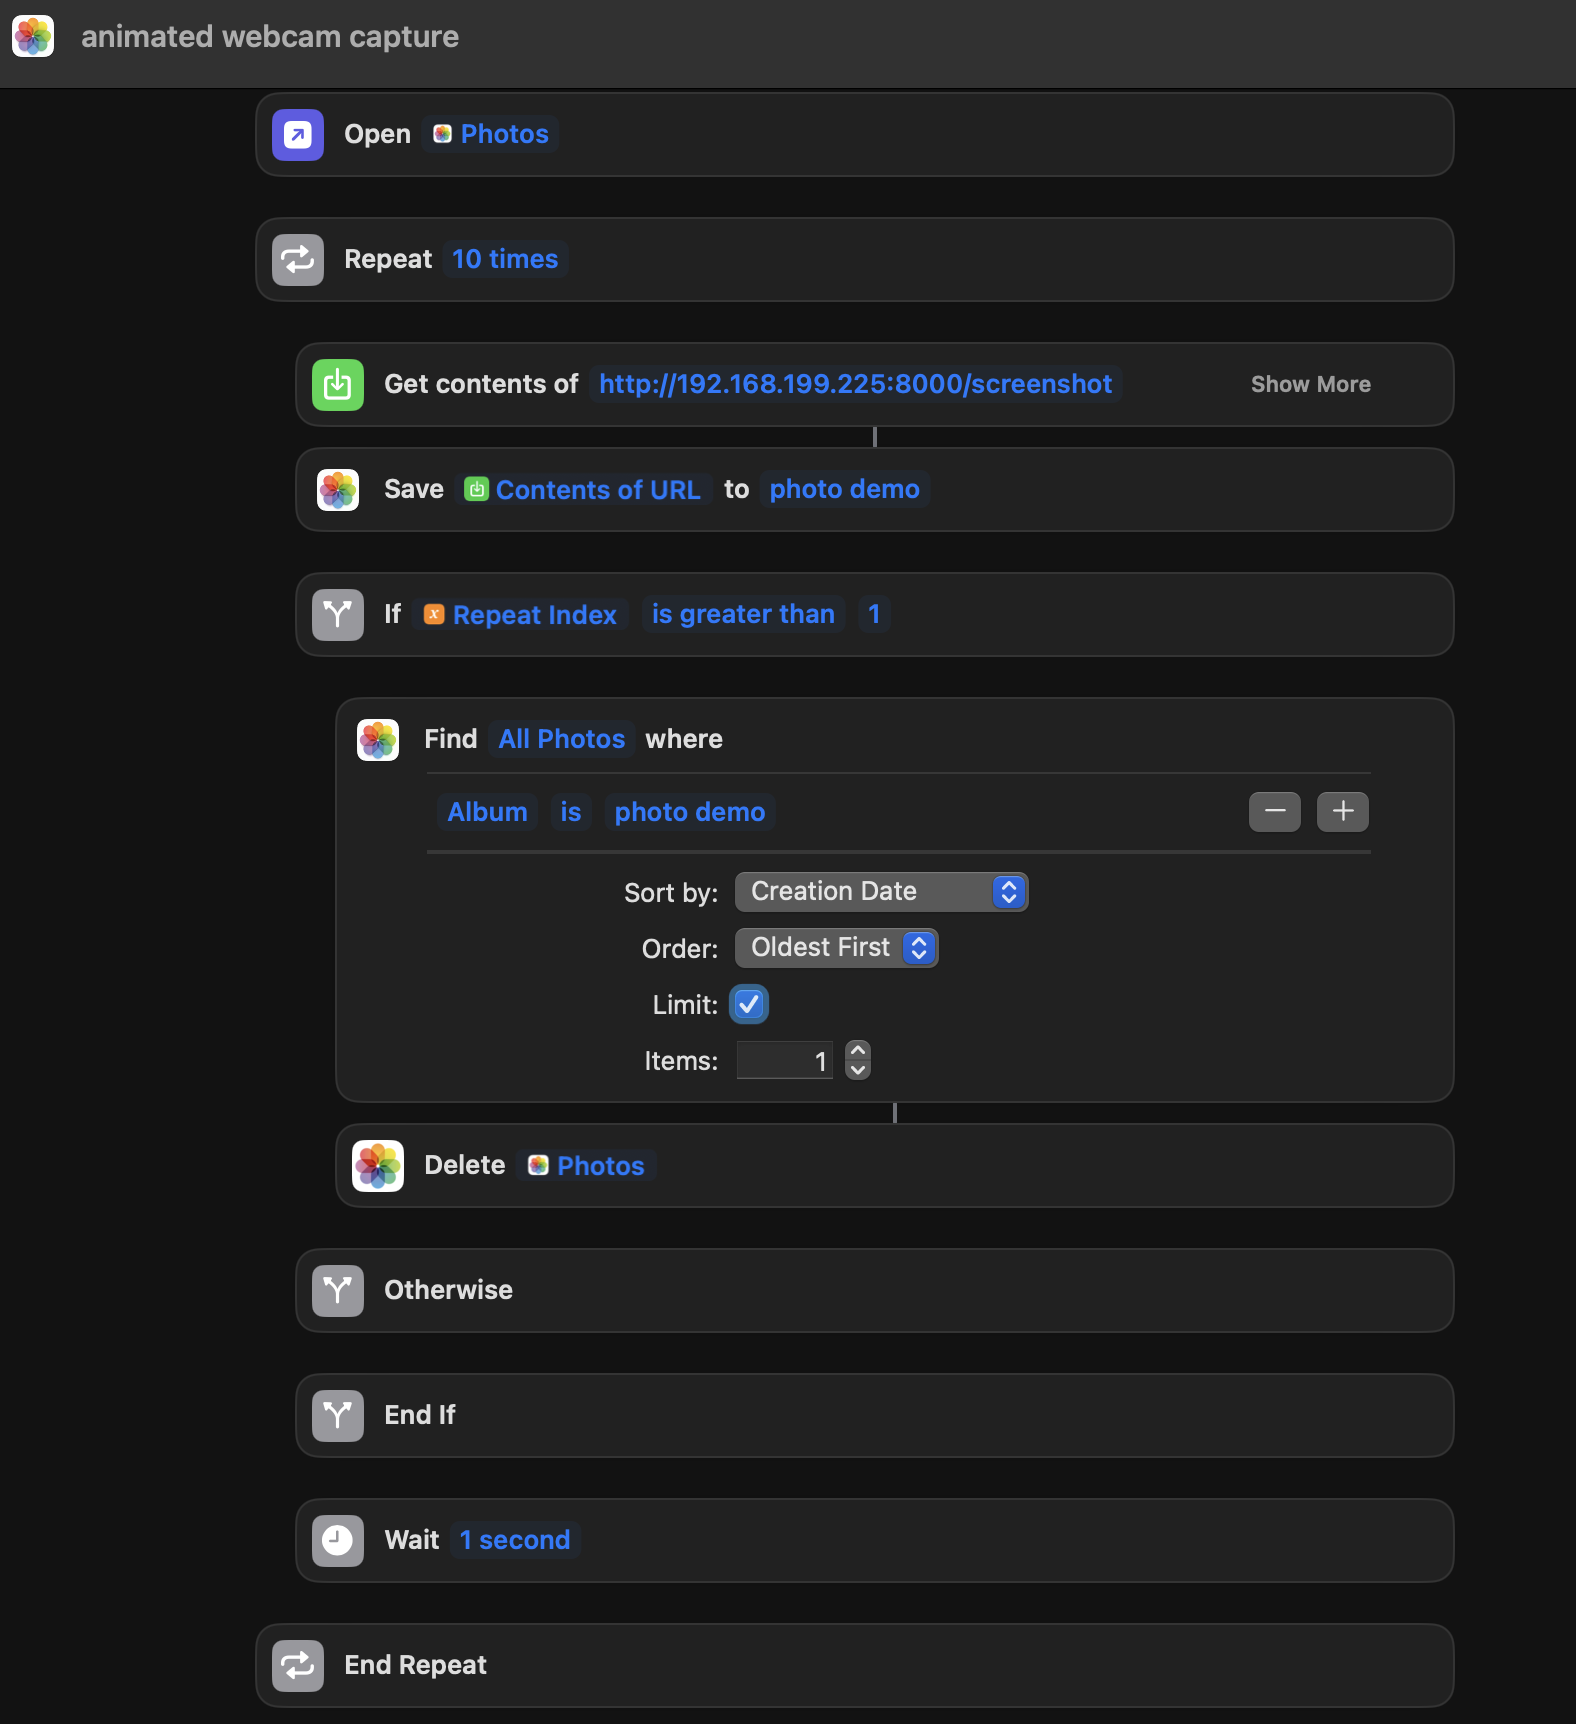
Just downloading the images to the app wouldn’t work - you’d still see old images so it wouldn’t be much of an animation - but Adnan came up with the following plan:
- Open up / maximize the first image
- Download the next image
- Delete the image that you were looking at
This way you’d get more of an animation effect. And this…kinda works! iOS plays an effect when showing you the new image - it kinda slides in - which is pretty disorienting (we tried to disable this by reducing animations, to no success). But it seemed promising enough to be worth pursuing.

says something about the project that this was 'promising'
The animations here are pretty disorienting - not ideal! But we wanted to see what they’d look like with a real game. We chose DOOM, since running DOOM in funny places is a meme. We hatched a plan.
Running DOOM, part 1
To run DOOM we needed…
- A running version of DOOM, somewhere, that we could control
- A way to control that version of DOOM from the photos app.
I tackled problem 1 and Adnan tackled problem 2 1. Problem 1 wasn’t too bad - I found a version of DOOM that was playable in the browser, and set up my laptop as a command and control server. You could send it a command (like “move forward” or “shoot”) and it would send the relevant keypress to the game and return an image from the game.
I’m skipping some details here - in particular, we went down a rabbit hole trying to abuse the “quick look” functionality of screenshots to display images. But we never got something demo-able working there, so I figure it’s not really worth covering. Fun rabbit hole though.
Adnan came up with the brilliant idea of abusing the AssistiveTouch feature on the phone to let us send commands from the photos app. The idea behind Assistive Touch is that you get a gamepad-like display that’s always on your screen that you can customize with different commands. This is really handy if your home screen button is broken but your screen works (you can use your screen to send the “Home” command) - or if you need various commands in easy reach (maybe for accessibility reasons).
AssistiveTouch gives you an 8-command pallet and the pallet can contain shortcuts. So we created 8 shortcuts mapped to 8 important DOOM commands - left/right/forward/back/strafe-left/strafe-right/reload/shoot - and hooked them up to endpoints in my command and control server.
So our shortcut code ended up looking very similar to our animation code. And our server code looks something like this:
server code
from flask import Flask, Response
from PIL import Image
import pyautogui
import io
import time
import mss
import mss.tools

app = Flask(__name__)

def do_screenshot(override=None):
    divisor = 2

    # Hardcoded coordinates of the DOOM window on nolen's laptop
    left = 742 / divisor
    top = 734 / divisor
    width = 1540 / divisor
    height = 960 / divisor
    right = left + width
    bottom = top + height

    with mss.mss() as sct:
        region = { "top": top, "left": left, "width": width, "height": height }
        sct_img = sct.grab(region)
        img = Image.frombytes('RGB', (sct_img.width, sct_img.height), sct_img.rgb)
        return img

def send_command_while_recording(keys):
    for key in keys:
        pyautogui.keyDown(key)

    # We need this for things like forward/back, since otherwise the key is only registered for like
    # a millisecond and you barely move
    time.sleep(0.10)
    frame = do_screenshot()

    for key in keys:
        pyautogui.keyUp(key)

    img_io = io.BytesIO()
    frame.save(img_io, format='PNG')
    img_io.seek(0)

    response = Response(img_io.getvalue(), mimetype='image/png')
    response.headers.set('Content-Disposition', 'inline', filename='screenshot.png')

    return response

@app.route('/forward', methods=['GET'])
def press_up():
    return send_command_while_recording(["up"])

@app.route('/backward', methods=['GET'])
def press_down():
    return send_command_while_recording(["down"])

@app.route('/fire', methods=['GET'])
def fire():
    return send_command_while_recording(["ctrl"])

#
# Imagine routes for all the relevant keys...
#

if __name__ == '__main__':
    try:
        app.run(host='0.0.0.0', port=8000)
    finally:
        # Release the video stream when the webserver is stopped
        cap.release()
menu selection!!
This was pretty exciting! We had wired DOOM up to the photos app. But our framerate was pretty bad.
We tried extending our code to download multiple images, but the animation that played every time a new image displayed got very disorienting. Which lead us to…
Running DOOM, part 2
We wanted to increase our framerate and decrease the frequency at which we downloaded new images (to see fewer animations when new images were displayed). What if we downloaded gifs?
We extended the code to take multiple screenshots of the game while it held down the relevant keys and to combine those screenshots into a gif before returning the image. There’s a bit of tricky stuff here - we want to make sure the length of our gif tracks with how long we held down the keys, to avoid returning a looping gif, and to keep track of the last frame of the prior gif and to use that for the first frame of the current one for continuity - but it wasn’t much more code than we already had.
extended code
from flask import Flask, Response
from PIL import Image
import pyautogui
import imageio
import io
import time
import mss
import mss.tools

app = Flask(__name__)

def do_screenshot(override=None):
    divisor = 1

    # Hardcoded coordinates of the DOOM window on nolen's laptop
    left = 742 / divisor
    top = 734 / divisor
    width = 1540 / divisor
    height = 960 / divisor
    right = left + width
    bottom = top + height

    screenshot = pyautogui.screenshot()
    cropped_image = screenshot.crop((left, top, right, bottom))
    cropped_image = cropped_image.resize((cropped_image.width // 2, cropped_image.height // 2))
    return cropped_image

# Use the last image of our last screenshot as the first image of our new one
# (for continuity)
OLD_SCREENSHOT = [None]
def send_command_while_recording(keys, delay=0.015, num_frames=3):
    start_time = time.time()
    frames = [x for x in OLD_SCREENSHOT if x is not None]
    if not frames:
        frames.append(do_screenshot())

    for key in keys:
        pyautogui.keyDown(key)

    for _ in range(num_frames):
        s = do_screenshot()
        # We need this for things like forward/back, since otherwise the key is only registered for like
        # a millisecond and you barely move
        time.sleep(delay)
        frames.append(s)

    for key in keys:
        pyautogui.keyUp(key)

    time.sleep(delay / 2)
    frames.append(do_screenshot())
    OLD_SCREENSHOT[0] = frames[-1]

    end_time = time.time()
    total_time = end_time - start_time
    duration = max(0.1, total_time / len(frames)) * 1000

    img_io = io.BytesIO()
    with imageio.get_writer(img_io, format='GIF', mode='I', duration=duration) as writer:
        for frame in frames:
            # Convert PIL image to numpy array by saving it to a BytesIO object first
            byte_io = io.BytesIO()
            frame.save(byte_io, format='PNG')
            byte_io.seek(0)
            writer.append_data(imageio.imread(byte_io))

    img_io.seek(0)
    response = Response(img_io.getvalue(), mimetype='image/gif')
    response.headers.set('Content-Disposition', 'inline', filename='screenshot.gif')
    return response

@app.route('/forward', methods=['GET'])
def press_up():
    return send_command_while_recording(["up"])

@app.route('/backward', methods=['GET'])
def press_down():
    return send_command_while_recording(["down"])

@app.route('/fire', methods=['GET'])
def fire():
    return send_command_while_recording(["ctrl"])

#
# Imagine routes for all the relevant keys...
#

if __name__ == '__main__':
    try:
        app.run(host='0.0.0.0', port=8000)
    finally:
        # Release the video stream when the webserver is stopped
        cap.release()
very playable
This was the first thing that seemed moderately playable. We’re moving around in the game! It’s feasible to navigate (kind of)!
The biggest problem at this point was the delay. We’re holding down our keys for a bit (because if you only hold down “up” for .01 seconds, the character doesn’t move very far) so there’s some built-in delay before we can return the gif at all. But we were doing two things that contributed to slowing things down even more:
- We were using pyautogui for screenshotting, and pyautogui’s screenshotting code is really slow
- We were creating gifs, which are kinda slow to create (our profiling told us it took 0.4 seconds, which is pretty long)
We went down a deep rabbit hole solving problem 1. The stack overflow question I linked proposes a solution - use a different screenshot library - but for some reason gifs created using that library didn’t work! They played fine on my laptop, but would not scan as gifs in iOS. It was a nightmare of a problem to debug - what are your search terms here? - and we started to give up hope.
But solving problem 2 gave us a solution. We thought mp4s might be faster to create than gifs, so we tried swapping out our implementation to create mp4s instead - and it was 4 times faster. And mp4s created from our much faster screenshot code worked just fine.
We swapped out our code to create mp4s with a faster screenshot utility and cut out the vast majority of our delay (outside of the built in delay while we held down keys on the server, which we couldn’t do much about 2).
We kicked around tons of ideas here that amounted to “can we stream something to the photos app” but never came up with something workable.
This got us very close to our end state:
almost there - but there's a big flaw
This almost worked. Video creation was substantially faster, and having faster screenshots meant we could experiment with upping our framerate. But there was a huge problem.
When we created gifs, we specified that they never looped. The photos app would respect that and would leave the gifs on their last frame, which made it easy to provide continuity between images. With videos the photos app would instead jump back to the first frame of the video when it finished playing. This is probably good UX in general, but it was a big problem for us - it made the whole experience super confusing!
It took us a while but we eventually hit on a delightfully stupid solution - we extended the video with several seconds of padding using the video’s final frame - so as long as you’re sending new commands reasonably quickly, you never see the end of the video (and it never loops back to the start).
This padding would have been a pain with gifs (they’d get big), but mp4s compress things well so adding a hundred of the same frame at the end was pretty cheap (this did add a little time, but it was still substantially faster than gifs).
That basically gave us our final product, which looked like this (I’ve gone ahead and added bindings for additional commands like shooting).
final code
from flask import Flask, Response
from PIL import Image
import pyautogui
import imageio
import io
import time
import mss
import mss.tools
import numpy as np

app = Flask(__name__)

def do_screenshot(use_pyautogui=False):
    divisor = 2

    # Hardcoded coordinates of the DOOM window on nolen's laptop
    left = 742 / divisor
    top = 734 / divisor
    width = 1540 / divisor
    height = 960 / divisor
    right = left + width
    bottom = top + height

    if use_pyautogui:
        screenshot = pyautogui.screenshot()
        cropped_image = screenshot.crop((left, top, right, bottom))
        cropped_image = cropped_image.resize((cropped_image.width // 2, cropped_image.height // 2))
        return cropped_image
    else:
        with mss.mss() as sct:
            region = { "top": top, "left": left, "width": width, "height": height }
            sct_img = sct.grab(region)
            img = Image.frombytes('RGB', (sct_img.width, sct_img.height), sct_img.rgb)
            return img

# Use the last image of our last screenshot as the first image of our new one
# (for continuity)
OLD_SCREENSHOT = [None]
def send_command_while_recording(keys, delay=0.015, num_frames=6):
    start_time = time.time()
    frames = [x for x in OLD_SCREENSHOT if x is not None]
    if not frames:
        frames.append(do_screenshot())

    for key in keys:
        pyautogui.keyDown(key)

    for _ in range(num_frames):
        s = do_screenshot()
        # We need this for things like forward/back, since otherwise the key is only registered for like
        # a millisecond and you barely move
        time.sleep(delay)
        frames.append(s)

    for key in keys:
        pyautogui.keyUp(key)

    frames.append(do_screenshot())
    OLD_SCREENSHOT[0] = frames[-1]

    end_time = time.time()
    total_time = end_time - start_time
    duration = total_time / len(frames)
    fps = 1/ duration

    video_io = io.BytesIO()
    with imageio.get_writer(video_io, format='mp4', fps=fps) as writer:
        for i, frame in enumerate(frames):
            writer.append_data(np.array(frame))

        for _ in range(50):
            writer.append_data(np.array(frames[-1]))

    video_io.seek(0)
    response = Response(video_io.getvalue(), mimetype='video/mp4')
    response.headers.set("Content-Type", "video/mp4")
    response.headers.set('Content-Disposition', 'attachment', filename='screenshot.mp4')
    return response

@app.route('/forward', methods=['GET'])
def press_up():
    return send_command_while_recording(["up"])

@app.route('/backward', methods=['GET'])
def press_down():
    return send_command_while_recording(["down"])

@app.route('/fire', methods=['GET'])
def fire():
    return send_command_while_recording(["ctrl"])

@app.route('/left', methods=['GET'])
def press_left():
    return send_command_while_recording(["left"])

@app.route('/right', methods=['GET'])
def press_right():
    return send_command_while_recording(["right"])

@app.route('/strafeLeft', methods=['GET'])
def strafe_left():
    return send_command_while_recording(["alt", "left"])

@app.route('/strafeRight', methods=['GET'])
def strafe_right():
    return send_command_while_recording(["alt", "right"])

@app.route('/use', methods=['GET'])
def use():
    return send_command_while_recording(["space", "enter"])

if __name__ == '__main__':
    try:
        app.run(host='0.0.0.0', port=8000)
    finally:
        # Release the video stream when the webserver is stopped
        cap.release()
I didn't notice the white border on the video till just now :(
Closing it out
Adnan closed things out by adding some finishing touches - he created an icon with the DOOM logo that started up music from the soundtrack, navigated to you the photos app, and downloaded a still image (we need to makes sure there’s a still image available for you to open at the start since we rely on deleting images to advance you to the next video). And then we…sat on this project for 3 months. Oops.
But working on it was a ton of fun! It’s rare that I work with someone else on a project right now; it was delightful to get to work with Adnan (maybe hire him??). And working with shortcuts was painful in the most fun way - one of my favorite things about making games like this is how stupid your problems end up being 3.
Although apple, if you’re reading this…please fix the shortcuts editor. It kept crashing on me and changing whether a call is in an if statement (for example) is super painful. Please. I just want to make stupid things.
I’m not sure this has totally scratched my itch for silly iOS things - doing this project gave me too many ideas! And I wish we had found a way to stream in the videos even more quickly to make the game feel more realtime. But I’m proud of what we ended up with here.
Thanks for reading! I’m working on a blog and video about the approach I take to silly projects like this; I’ll be back soon with more stuff :)